How to Create a Tool Attachment Point for Tool Tethering - Toolbox Talks
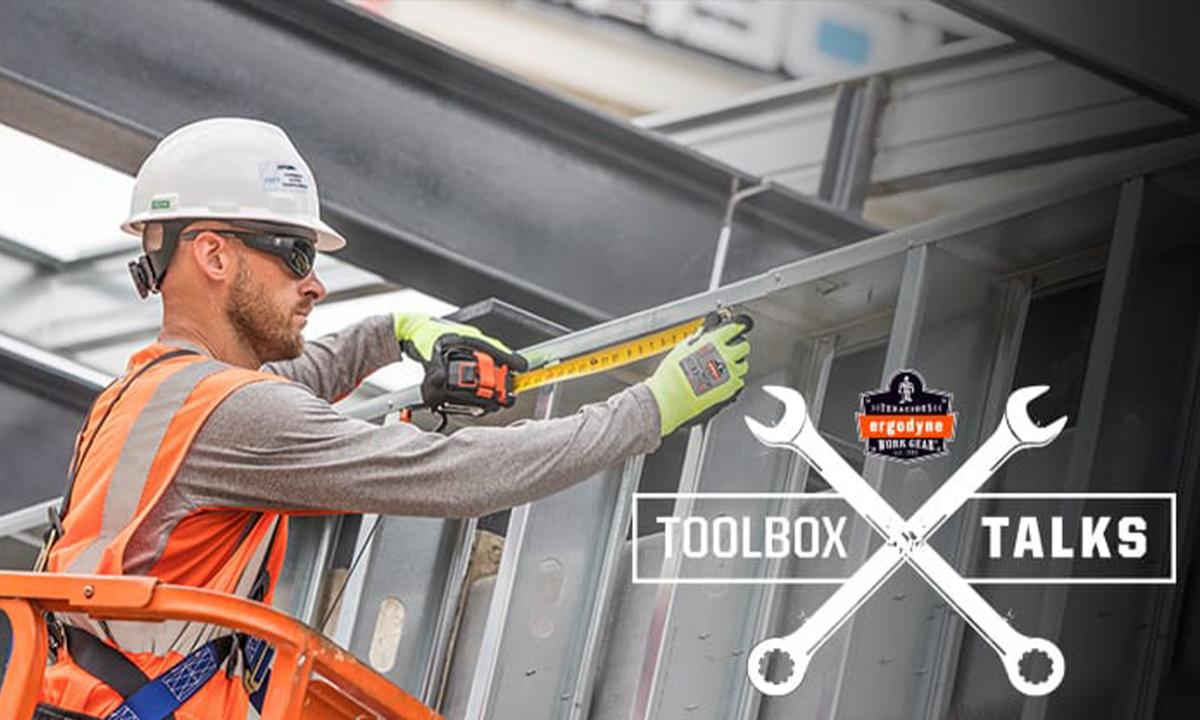
Toolbox Talks are intended to facilitate worksite health and safety conversations. Download the Toolbox Talks PDF on the basics of creating tethering attachment points on your tools to prevent dropped objects.
With 52,000 injuries, 278 fatalities and hundreds of millions of dollars lost annually, the time for Dropped Object Prevention is now.
And not to break the hearts of the wannabe-MacGyvers out there, but improving these statistics is going to take more than duct tape and string. Thanks to ANSI/ISEA 121, tethering tools is now a legitimized operation — complete with design, testing, performance and labeling requirements intended to increase safety while working at height.
This Toolbox Talk will get you into the game. Teaching workers what to look for on their tools and presenting a variety of solutions for those tools will lead to creation of effective tool tethering systems that are unique to your worksite and needs.
TOOL ANATOMY 101
The first phase of tethering tools is analyzing the characteristics of the tools being used. This enables you to choose the best possible solution for preventing dropped objects.
STEP 1: Identify Tool Type
Tool type and geometry (shape/body type) will help determine whether your tool can be directly tethered to a lanyard or if a trapped connection point needs to be applied and, in the case of the latter, what type of retrofit connector is needed.
Primary Tool Types
- Hand Tools: Tools with a natural, fully enclosed hole or handle built into the body (e.g., adjustable wrenches, hand saws, pipe wrenches)
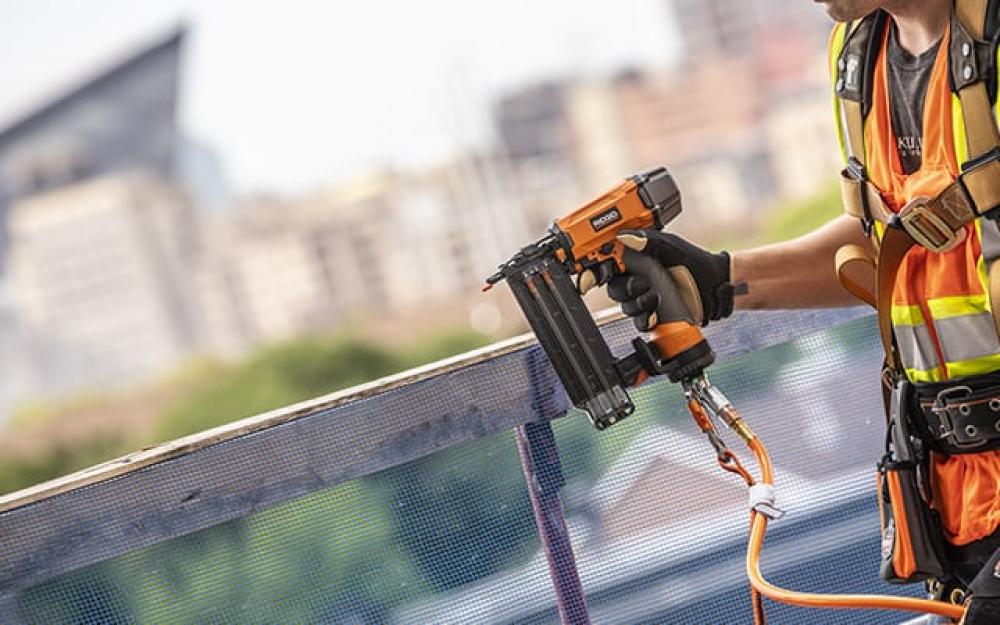
- Power Tools: Tools requiring a power source to operate — most often a removable battery or cord (e.g., drills, impact drivers, grinders)
- Instruments: Tools with specific interfaces for measuring, testing, communicating or lighting (e.g., tape measures, radios, cell phones, voltage meters)
- Other: Tools or equipment that don’t fall into the other categories (e.g., PPE, clamps, canisters, water bottles)
Tool Geometry Types
- Captive Hole or Handle: Tool has enclosed hole or engineered handle
- Captive Waist or Neck: Tool has inner midsection between two thicker ends
- Non-Captive: Tool has no captive geometry — consists of open ended handle or other design
STEP 2: Measure Tool Weight
Measure the weight of each tool (do not guess!) and mark that weight on each tool or in your equipment log. All Ergodyne Objects-at-Heights solutions, specifically dropped object prevention solutions, are built with a specified capacity marked on the product. You will need to compare the weight of the tool to the capacity of each solution.
Step 3: Measure Tool Size
Use a caliper, tape measure or ruler to measure the size and determine what type of tool attachments are needed. For open ended and waisted tools, measure the diameter (thickness) of the area you would like to apply the connection. For captive tools, measure the size of the captive connection point to determine the appropriate tool lanyard connector.
Step 4: Record It
Document all information in a tool inventory log.
TOOL TRAPPING: HOW TO CREATE TOOL ATTACHMENT POINT
Dropped Object Prevention Best Practices involve the Three T’s:
- Trapping: Creating connection points
- Tethering: Connecting tools to an anchor
- Topping: Covering open containers
Most tools do not come with a built-in, secure attachment point. In these cases, you need to retrofit a safe connection point to the tool. This is called trapping. Start by choosing the appropriate attachment based on determined tool anatomy.
Share the video on How to Prevent Dropped Objects by Tethering, Topping, and Trapping
Types of Attachments for Hand Tools:
- Captive Hole/Handle: Squids Tool Tails
- Captive Waist/Neck: Squids Shackle Traps
- Non-Captive: Squids Tool Tails and Hand Tool Traps
Types of Attachments for Power Tools:
- Captive Hole/Handle: Squids Tool Tails
- Captive Waist/Neck: Squids Power Tool Traps
- Non-Captive: Squids Brackets
Types of Attachments for Instruments:
- Captive Hole/Handle: Squids Tool Tails
- Captive Waist/Neck: Squids Tool Tails and Traps
- Non-Captive: Squids Tool Tails and Traps
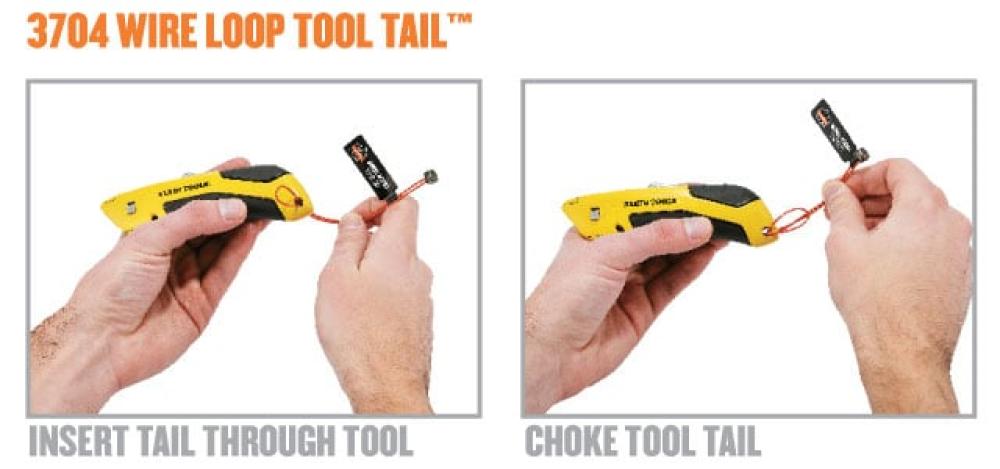
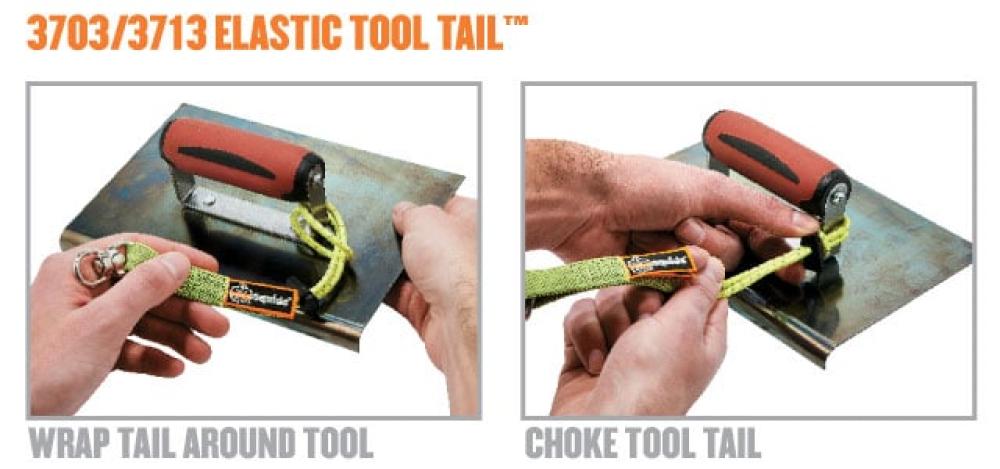
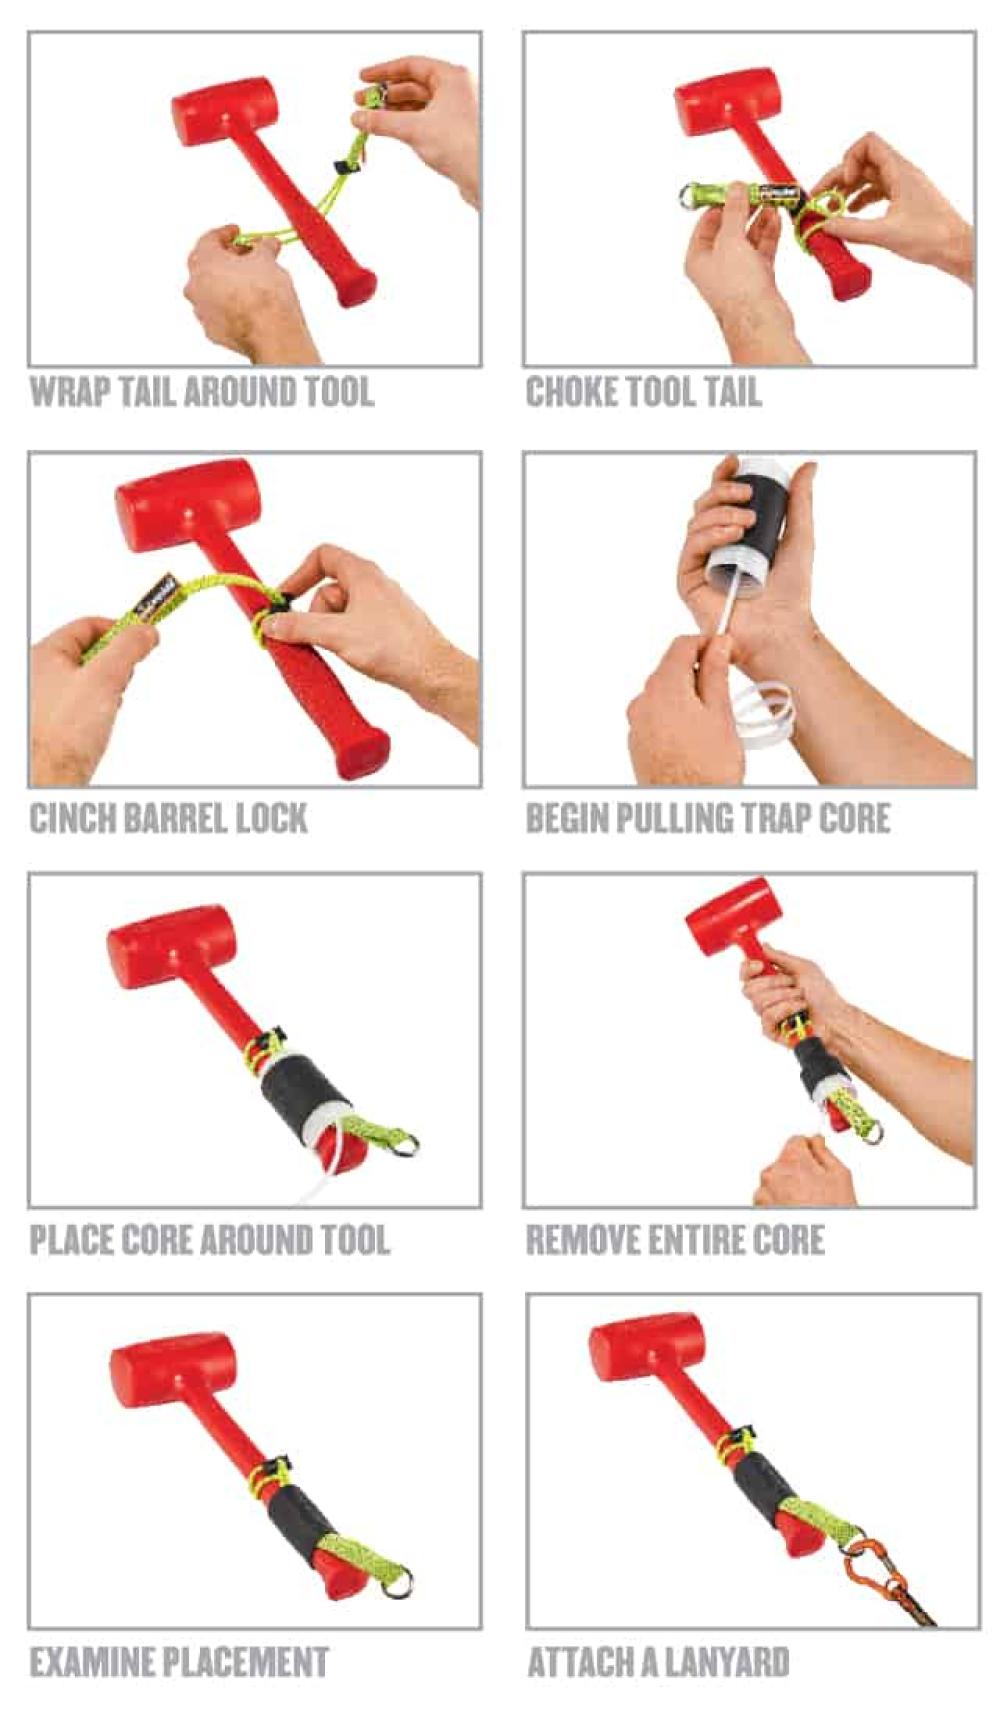
INSTALLING SQUIDS TOOL TAILS
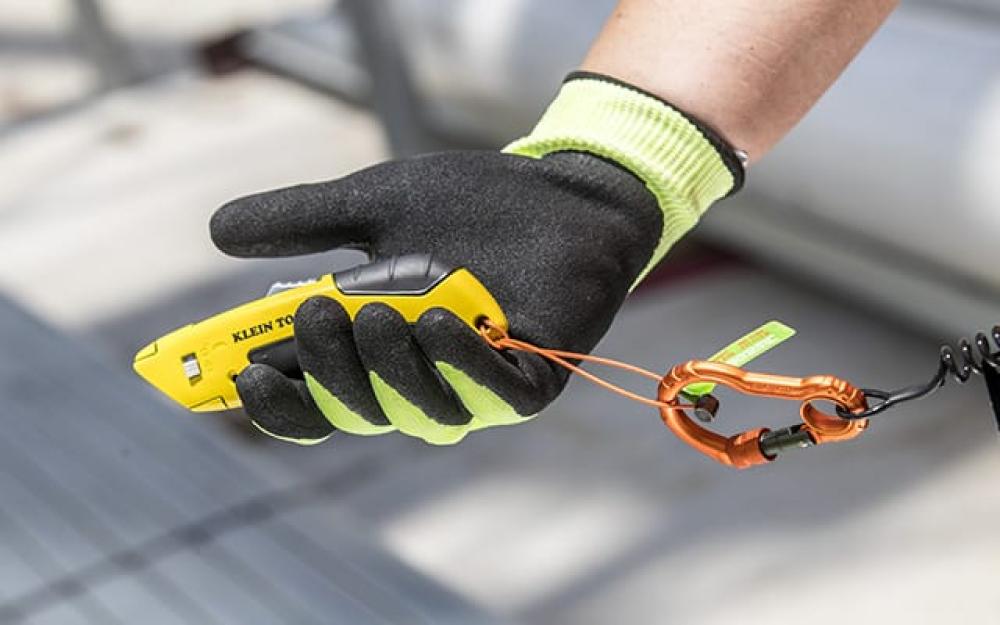
Tool Tails are the unsung hero of most fall protection systems, tethering tools like utility knives, small levels, speed squares, insulated pliers and other objects with small captive holes.
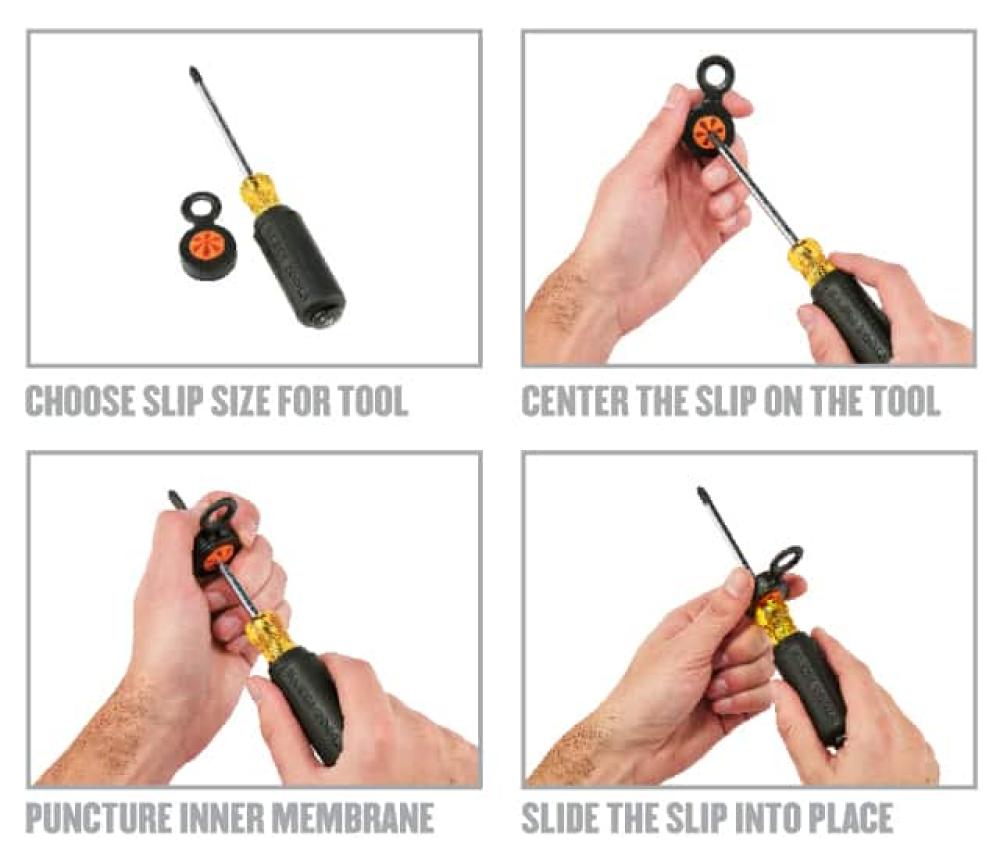
INSTALLING SQUIDS HAND TOOL TRAPS
Connection points can be tricky to find on smaller hand tools like screwdrivers and hex keys. That’s where Squids Slips come in.
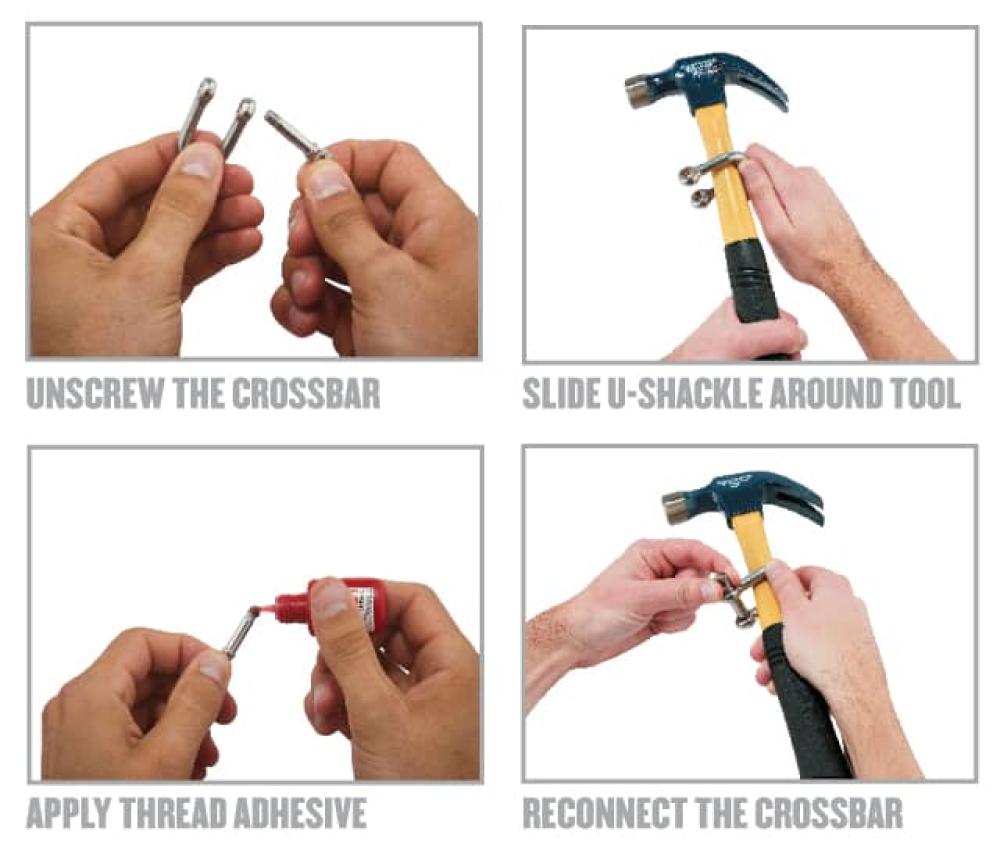
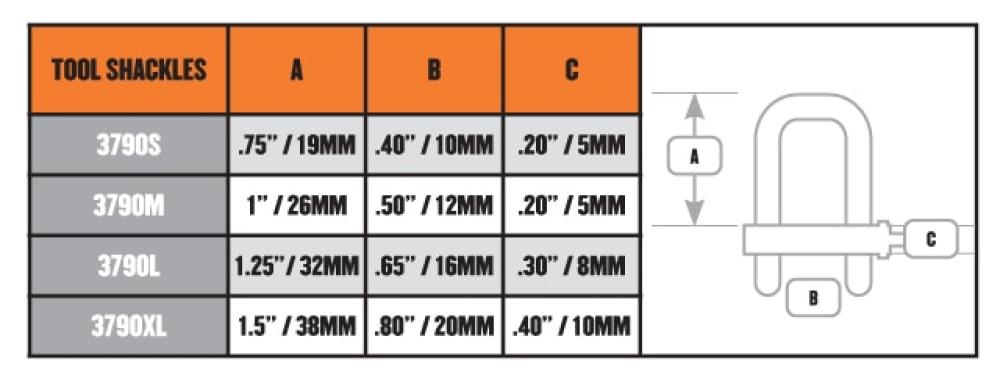
INSTALLING SQUIDS SHACKLE TRAPS
U-shaped Tool Shackles connect to waisted/necked tools (with tapered mid sections) or tools with captive holes, creating clean, secure attachment points for tethering.
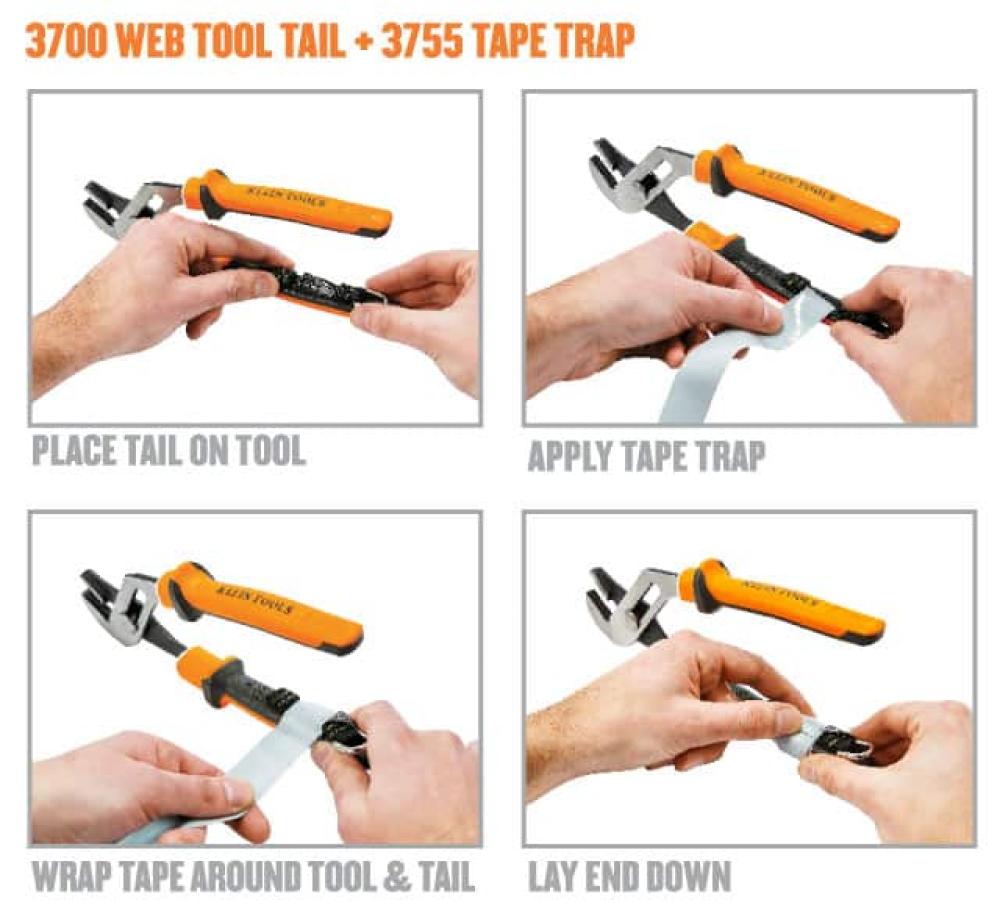
INSTALLING SQUIDS TAPE TRAPS
When all else fails, tape it up. Squids Self-Adhering Tape Traps provide added security and grip for a variety of hand tools without requiring heat for adherence.

INSTALLING SQUIDS COLD SHRINK TRAPS
Tool too large or heavy for a tape trap? Enter, Squids Cold Shrink Traps. These handy solutions create secure tool attachment points instantly and with ease.
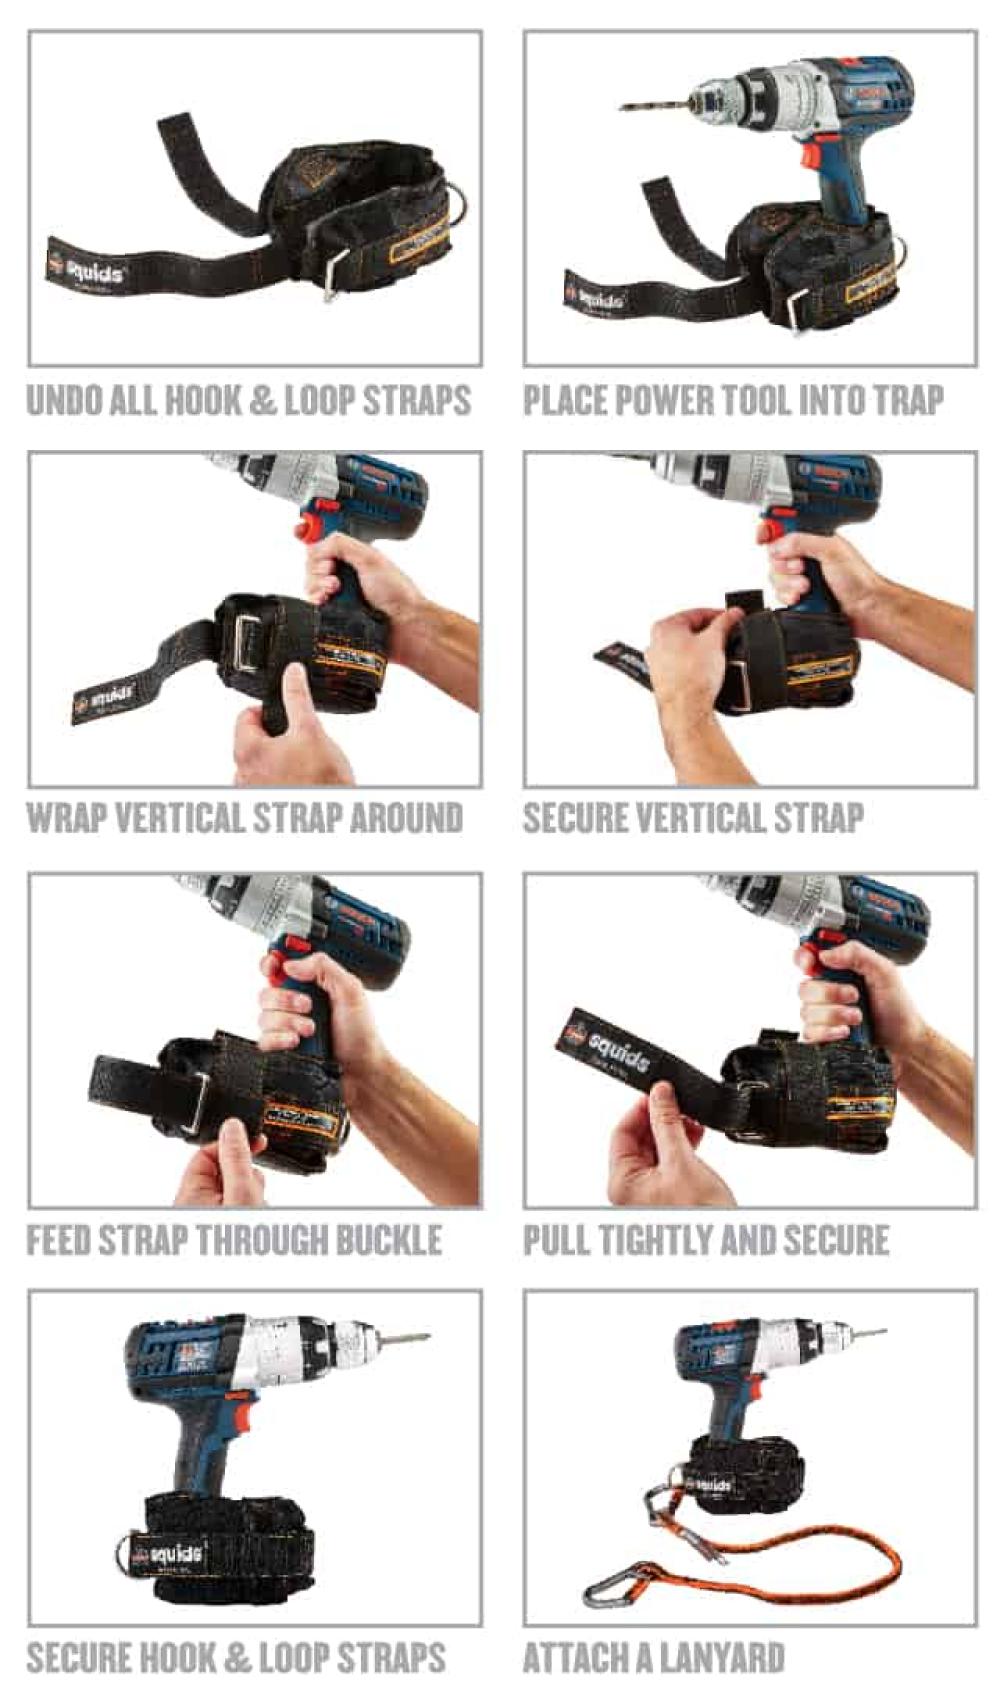
INSTALLING SQUIDS POWER TOOL TRAPS
The power tool trap securely wraps around the battery portion of drills, impact drivers and other cordless power tools. D-ring connection point attaches to a tool lanyard to prevent drops.
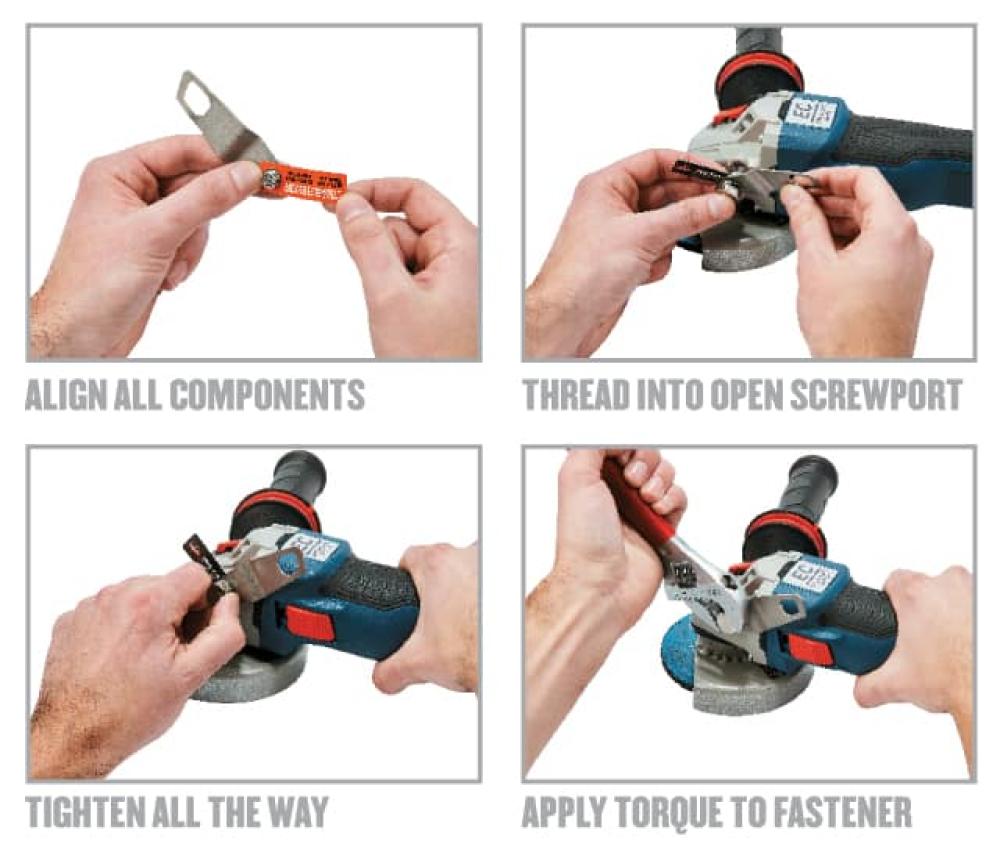
INSTALLING SQUIDS BRACKETS
The Power Tool Bracket creates a unique tool attachment point to tether corded and cordless grinder power tools with a tool lanyard.
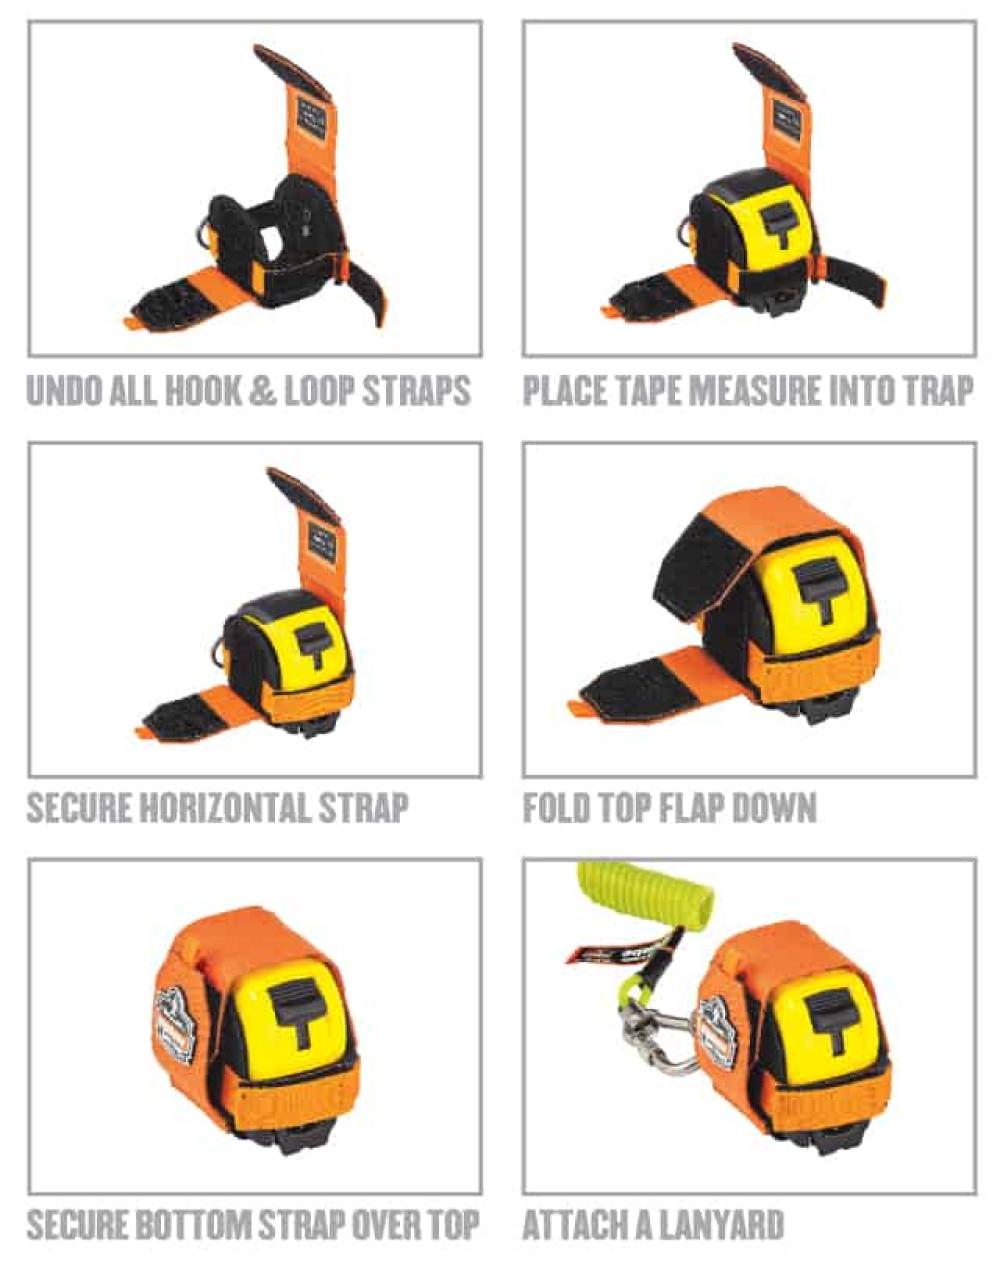
USING SQUIDS TAPE MEASURE TRAP
The tape measure trap securely wraps around most standard tape measures, with a D-ring that attaches to a tool lanyard for dropped object prevention.
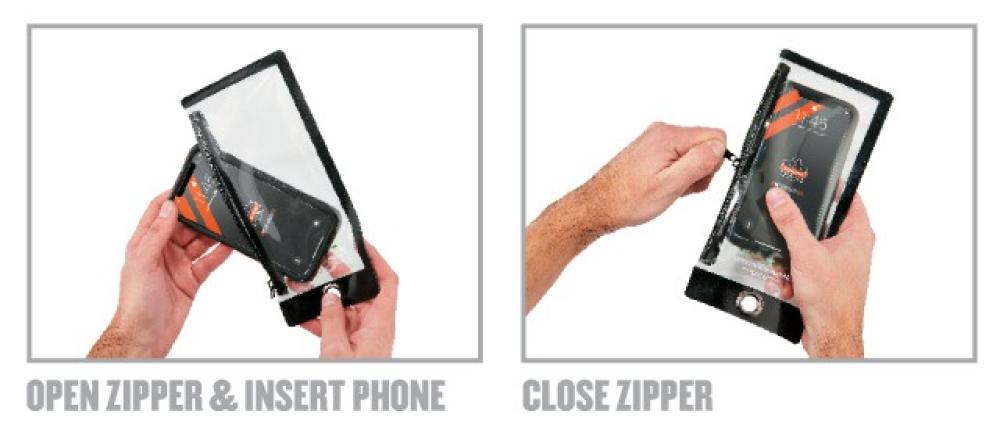
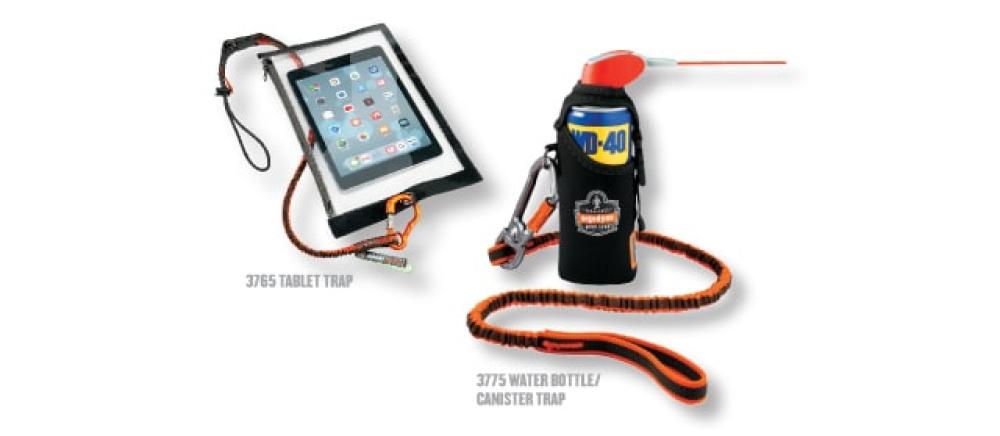
USING SQUIDS SLEEVES
Safely bring your devices to heights with water-resistant phone and tablet traps, as well as water bottles and canisters with adjustable neoprene sleeves.
TALK TO YOUR CREW
What good is all this knowledge if you don’t share it? Taking a few minutes before a shift to educate your crew on how to safely tether tools for working at heights is a simple yet effective measure for reducing risk and boosting productivity. Share this PDF with your crew to educate them on creating tool attachment points.

LEARN EVEN MORE
All of that is a lot better than duct tape and string, right? And to think, this is only one-third of the Dropped Object Prevention trapping-tethering-topping puzzle. For a deeper dive into tool tethering and the statistics around workplace safety at-heights, check out our Dropped and Falling Objects page.